In today’s world of interior design, floating vanities have taken the spotlight for their sleek appearance and space-saving capabilities. You can design and build your own floating bathroom vanity DIY project, giving your space a custom look at a fraction of the cost. In this guide, we’ll dive deep into the process of crafting a floating vanity, provide useful design tips, and explain why a DIY approach can lead to stunning results. We’ll also explore a variety of floating vanity ideas to suit different design preferences and highlight the benefits of choosing SpryInterior for high-quality craftsmanship.
1. Why Go for a Floating Bathroom Vanity?
Before we get into the DIY aspect, it’s important to understand why floating vanities have become a favorite choice for modern bathrooms. Bathroom floating vanities are mounted directly to the wall, leaving the floor beneath open, which creates the illusion of more space. This is especially beneficial for small bathrooms where floor space is limited. Not only do floating vanities look sleek and contemporary, but they also allow for easier cleaning and provide room for additional storage or decorative elements.

The design flexibility of floating vanities is unmatched, whether you prefer minimalist, rustic, or industrial styles. They can be customized in terms of materials, colors, and sizes to perfectly match your bathroom’s aesthetic. This versatility is what makes floating bathroom vanity DIY projects so popular, as homeowners can tailor the design to suit their exact preferences.
2. Planning Your Floating Bathroom Vanity DIY Project
The success of a floating bathroom vanity DIY project starts with proper planning. Here are the key steps you should follow before diving into construction:
Measure Your Space
Before you begin, you’ll need to take accurate measurements of your bathroom to ensure your vanity fits perfectly. This includes measuring the height at which you want the vanity to be mounted, the width of the wall where it will be installed, and how deep you want the vanity to be. The height is particularly important for functionality—standard vanities are typically mounted around 30 to 32 inches off the ground, but you can adjust this based on your needs and preferences.

Choose Your Materials
The beauty of a DIY vanity is that you can choose materials that match your design vision and budget. If you’re going for a natural or rustic look, wood is a great option, especially reclaimed or distressed wood. For a more industrial feel, consider using metal brackets or combining wood with concrete for a rugged appearance. Laminate and quartz are popular for a sleek, modern finish, while stone adds a luxurious touch. No matter what you choose, be sure to select materials that are durable and water-resistant, as bathroom vanities will be exposed to moisture.

Decide on the Style of Sink
The sink is a major component of your vanity design and will impact both the look and function of the vanity. Popular sink choices for a floating vanity include vessel sinks, which sit on top of the counter and make a bold statement, or undermount sinks, which are installed beneath the countertop for a streamlined appearance. An integrated sink, where the sink is molded as part of the countertop, offers a seamless and modern look. When choosing a sink, consider how it will complement your overall design and the countertop material you’ve selected.

3. Step-by-Step Guide to Building a Floating Bathroom Vanity
Now that you’ve done your planning, it’s time to move forward with your floating bathroom vanity DIY project. Here’s a step-by-step guide to help you through the construction process:
Step 1: Gather Materials and Tools
You’ll need basic tools for this project, such as a drill, saw, level, measuring tape, brackets, screws, and wall anchors. For materials, this will vary depending on your design, but common materials include plywood or solid wood for the vanity base, the chosen countertop material, and hardware for any drawers or cabinets you plan to include.
Step 2: Cut and Assemble the Vanity
Using your measurements, cut the wood panels or plywood for your vanity base. You can either build a simple box design or add drawers or shelving depending on your storage needs. Assemble the base using wood glue and screws for stability. If you’re adding drawers, install the drawer tracks and ensure they are aligned properly.

Step 3: Install the Vanity Brackets
Next, install heavy-duty metal brackets on the wall to support the weight of the vanity. This is one of the most critical steps in the process, as the brackets need to be securely fastened to wall studs to ensure the vanity remains stable and safe. Use a level to ensure the brackets are installed evenly.
Step 4: Mount the Vanity
Once the brackets are securely in place, it’s time to mount the vanity. Carefully lift the vanity and place it onto the brackets, securing it with screws. Use a level again to ensure everything is aligned correctly. If your vanity includes a countertop, install it at this stage, making sure it is properly sealed to prevent water damage.
Step 5: Install the Sink and Plumbing
Finally, install the sink and connect the plumbing. Depending on the type of sink you’ve chosen, the installation process will vary, but it’s important to make sure all connections are watertight to prevent leaks. If you’re not confident with plumbing work, consider hiring a professional to ensure everything is installed correctly.

4. Creative Floating Vanity Design Ideas
There’s no shortage of bathroom floating vanity ideas to explore when designing your DIY project. Whether you’re aiming for a modern, minimalist look or a more rustic, industrial aesthetic, here are a few ideas to inspire you:
Minimalist Floating Vanity with Integrated Storage
For a sleek, modern bathroom, consider a floating vanity with integrated storage that keeps everything hidden from view. Handleless drawers and smooth surfaces contribute to the minimalist aesthetic, while providing ample space to store toiletries, towels, and other essentials.

Rustic Floating Vanity with Natural Wood Accents
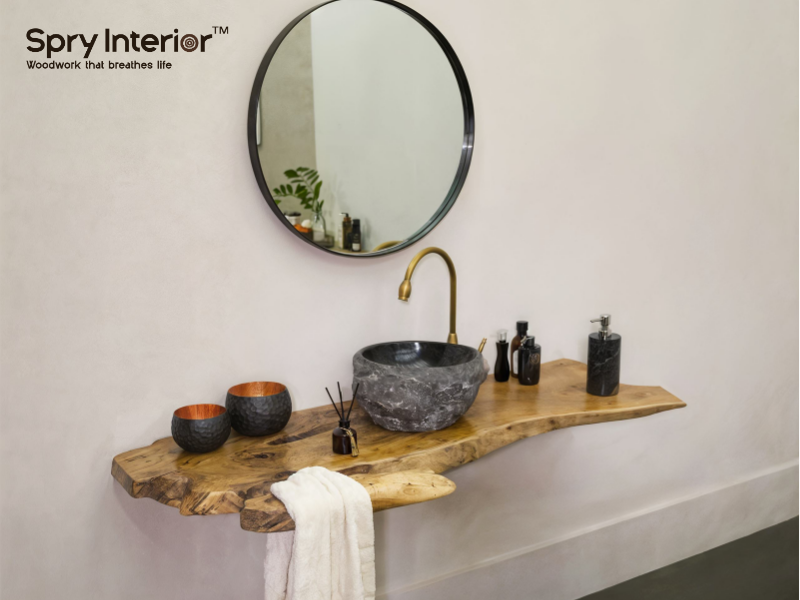
A floating vanity made from reclaimed or distressed wood can add warmth and character to a bathroom, especially when paired with industrial-style fixtures such as black metal brackets or exposed piping. This design works particularly well in bathrooms with a rustic or farmhouse aesthetic.

Double Floating Vanities for Larger Bathrooms
For homeowners with larger bathrooms, double floating vanities offer a practical and stylish solution. By installing two sinks on a single floating vanity, you provide more countertop space and storage while maintaining the open, airy feel that floating vanities are known for. This design is ideal for master bathrooms where multiple users need space.
Floating Vanity with Vessel Sink
A vessel sink adds a bold, modern touch to any floating vanity. The sink sits on top of the countertop, creating a focal point in the bathroom. Vessel sinks come in a variety of materials, from stone and ceramic to glass, allowing you to customize the look of your vanity.

5. SpryInterior: Your Source for High-Quality Floating Vanities
If you’re looking for high-quality materials and craftsmanship for your floating bathroom vanity DIY project, look no further than SpryInterior. Known for their attention to detail and use of sustainable, natural materials, SpryInterior offers a range of customizable vanities to suit any bathroom design. Whether you’re aiming for a minimalist floating vanity or a rustic wood design, their products are designed to provide both style and functionality.
SpryInterior floating vanities are crafted from durable, eco-friendly wood and are available in a variety of finishes to match your bathroom’s aesthetic. Each vanity is carefully handcrafted to ensure longevity and beauty, making it a worthwhile investment for any homeowner. For those working with smaller spaces, SpryInterior also offers a selection of small floating bathroom vanities that maximize space without compromising on style.

One of the standout features of SpryInterior vanities is their ability to be customized to your exact specifications. Whether you need a vanity for a small powder room or a larger double vanity for a master bath, SpryInterior can help you create the perfect piece to elevate your bathroom’s design.
Conclusion
In conclusion, building a floating bathroom vanity DIY is not only a rewarding project but also a great way to customize your bathroom to fit your personal style. With the right materials, tools, and creativity, you can craft a vanity that is both functional and visually stunning. And with SpryInterior’s high-quality products, you can be confident that your vanity will stand the test of time while enhancing the beauty of your space.


Leave a comment
This site is protected by hCaptcha and the hCaptcha Privacy Policy and Terms of Service apply.